|
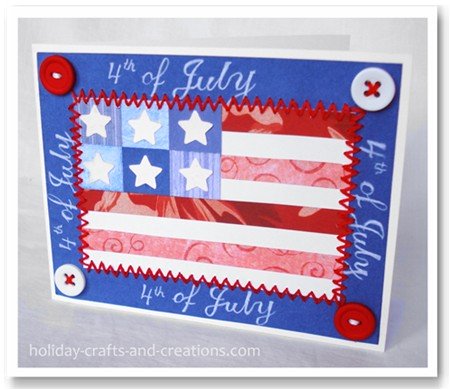
4th of July Cards: Quilt Flag CardIf you need some ideas for 4th of July cards or 4th of July invitations, this "quilted" flag card is cute and easy to make! We have provided the template (.pdf file), so all you need is some fun red and blue scrapbooking paper. So if you want a special way to invite all your friends over for the 4th, or you simply feel like sending someone a card in celebration, this flag card is just the thing!

What You Will Need White card stock Blue construction paper Red and blue scrapbooking paper 2 red buttons and 2 white buttons Red and white embroidery thread White colored pencil Glue or double sided tape and scissors Instructions for 4th of July Cards: Quilt Flag CardStep 1: First, cut a piece of white card stock that measures 4.25" by 11" and fold it in half. Then print out the provided 4th of July cards template (.pdf file) and cut out the bordered flag. Trace this onto your blue construction paper and cut it out. Then cut out just the flag and trace this onto your white card stock and cut it out. Then you can cut out the stripes and boxes and trace these onto the scrapbook paper of your choice. You only need to cut out four red stripes, since the other four will be white. Step 2: Glue the blue boxes and red stripes onto your white rectangular piece of paper as the pattern shows. Then, cut out the stars and glue one in each of the blue boxes. We used a star punch for ours, but since you may not have one of these, the provided star templates will look just as nice. Step 3: Now that your flag is complete, you are about ready to glue it down. But first, write "4th of July" around the edges of the blue construction paper using your white colored pencil. We just wrote it on by hand. The font we used is provided on the template if you would rather use it in some other way like printing it out. Step 4: Now you can glue your flag down in the center of the blue construction paper. Next you will stitch around the edges with a zig-zag stitch. Note: This can be done on a sewing machine, or simply drawn on with colored pencil, but we will show you how to sew it on by hand...
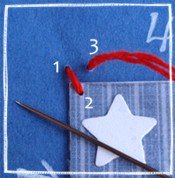
First, if you want a thinner look, divide your embroidery thread into three strands rather than six, and thread the needle. Starting in the upper left hand corner, thread the needle up through the paper as you can see in the above photo at #1. Then poke your needle down at #2 and tie a knot in the back to secure the thread. Next, come back up at #3, and down again at #2.
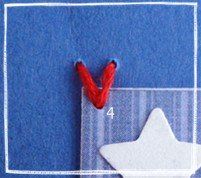
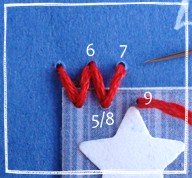
In the next photo, we've labeled this #4. This is now what your stitch should look like. Moving on to the last photo, you will now poke your thread up through the paper at #5 and down again at #6. Then up through #7 and down again at #8 (also #5). Now up again at #9, and down through #7. Hopefully you now have the idea of this stitch down. Continue stitching around the card. The corners are a bit tricky, but we didn't do anything special, just turn the card and continue stitching, trying to make it look as good as possible. 

Step 5: The only thing left to do is sew the buttons in the corners and glue it down. We used red thread for the white buttons and white thread for the red buttons. Once they are securely sewn down, you can either glue or tape the blue paper down to the front of your folded card stock. If gluing, be sure to hold the edges down long enough so the knots from the thread underneath doesn't pop the paper up. If you would like to see more 4th of July cards and ideas, click the link below. Return to 4th of July Crafts from 4th of July Cards: Quilt Flag Card
|


