|
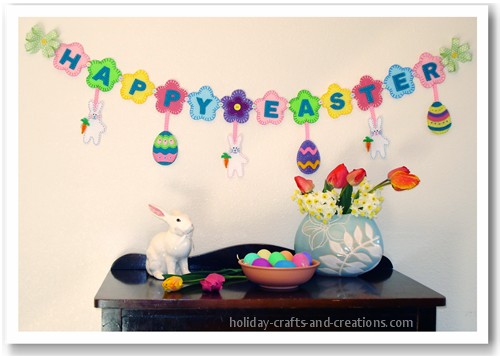
Easter Craft Ideas: Felt Easter GarlandIf you need some cute Easter craft ideas, than this felt Easter garland makes an adorable wall hanging to lighten up your home! Felt is very easy to work with and we have used simple embroidery stitches that anyone can do! This project also is very inexpensive, but yet it makes a big impression of spring in your home.

Materials for Easter Craft Ideas: Felt Easter Garland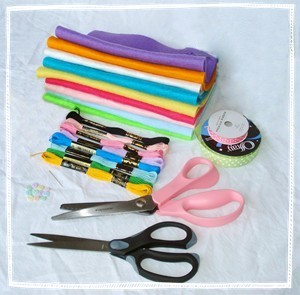
What You Will Need: Felt: Spring colors + white, green and orange Embroidery thread to match felt colors Ribbon – One color 1/4" – 1/2" wide and about 20" long, another color at 5/8" wide and at least 40" long Buttons – 11 small pastel buttons (about 1/2" wide), 3 large yellow buttons (about 3/4" wide) Needle Scissors Optional: Pinking shears Instructions For Easter Craft Ideas: Felt Easter GarlandStep 1: Select felt in the spring colors that you would like to use, and then decide on the layout of your color scheme. Also decide if you want the thread to match or contrast the felt color. Do you want all the letters to be the same color or do you want them to all be different colors? As you can see from the picture, we chose thread that matched the felt flower color, but was a contrasting hue. We also decided that all letters would be the same color. Step 2: Once you have chosen your color layout, print out the Easter garland template and trace the larger flower pattern onto your selected colored felt. You will want to cut out 12 of these flowers in total. Then trace and cut out one smaller felt flower using the pattern on the provided template. Pick a color that will go nicely with one of the larger flowers. Print the "Happy Easter" template. Finally, trace and cut out the letters. Obviously you will need to cut out more than one of some felt letters in order to spell out "Happy Easter."
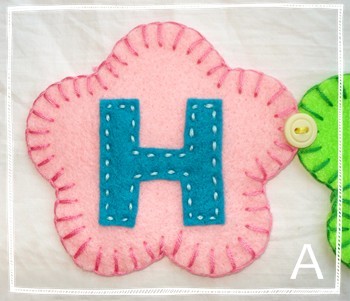
Step 3: Stitch each letter to the center of a flower. You might want to align the top of each letter with a flower pedal, so each flower looks consistent. Take a look at the photo at the very top of this page to see how we did this. Stitch on the letters using a basic running stitch around the border. See photo A. Also stitch the small flower to the center of your chosen corresponding larger flower in the same way. Then sew a button in the center of this smaller flower. It can be any size button, but we chose one that was 3/4" wide. See photo B. 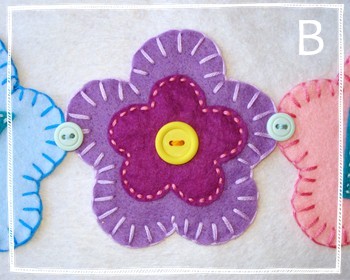
Step 4: Now that the letters are all sewn on, stitch around the edge of each flower using a blanket stitch. See photo A or Photo B. Step 5: Connect the felt flowers to each other with a button that is about 1/2" wide. Simply place the flowers next to each other so the petals are touching, and place the button on top of the two pieces of felt and then sew the button on. See photo A or B for an idea of how this looks.

Step 6: Cut out 3 bunnies in white felt, using the template provided. Stitch around their edge using the running stitch. We used a different color thread on each bunny. You will next want to sew on the bunny faces! You can do this any way you want, but we will explain how we did ours. Start the face by stitching on the nose. Center the nose where you want it and then you can sew the rest of the face on from there. We stitched on the nose by doing a series of vertical straight stitches that are lined up side by side. See photo C of the bunny to see what this looks like. Basically just make up and down stitches, trying to make a triangular nose shape. Both the mouth and the whiskers are made by using a back stitch. The eyes were made using French knots with black thread.
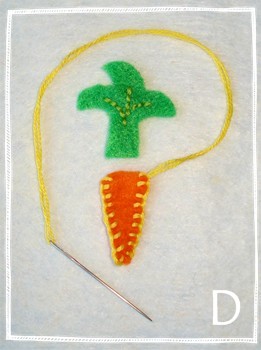
Step 7: Cut out 3 carrots and 3 carrot tops using the provided templates. Stitch the lines on the carrot tops first with a back stitch. The carrot tops will be stitched first, without being attached to the bunny or the carrot at this point. See photo D. Stitch the edge of the carrot using the blanket stitch. This is also to be done separately from all other pieces. Stitch all the way around the carrot EXCEPT for the top edge. Once you are to this point, lay the carrot top and carrot together (carrot top will go behind the carrot) and then lay it on the bunny’s hand where you want it. Now using the back stitch, sew the carrot top and carrot onto the bunny by sewing across the top edge of the carrot. The bunny should now be complete. Repeat this process for the other two bunnies.
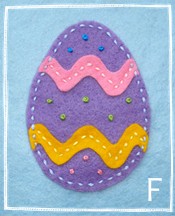
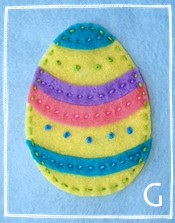
Step 8: Cut out 3 eggs next, using the provided Easter egg template. These can be done in any color you like. As you can see, we have provided certain egg patterns, and have done them in the colors of our choosing. But feel free to use whatever colors you like, as well as any pattern you can think up! Take a look at the egg photos E, F & G for more detail. You can see that we just used the French knot and the running stitch to make these patterns. 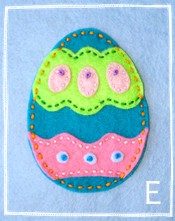
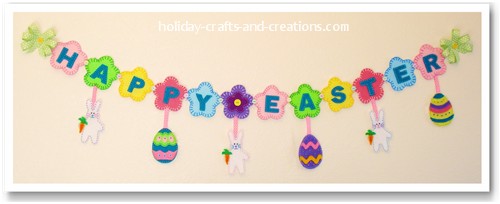
Step 9: Next take your narrower ribbon and cut 6 pieces that are 3” long. You will sew the bunnies and eggs onto the garland with these ribbons. See photo at bottom of page. Step 10: Make two button bows with the wider ribbon and a 3/4" button. Visit our Ribbon Button Bow page to learn how this is done. 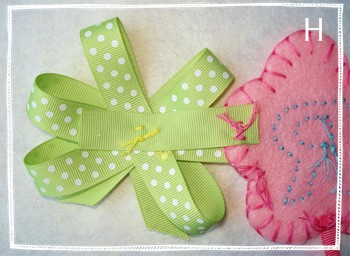
Step 11: Cut two 3" pieces of the wider ribbon (same ribbon as the button bow). Sew one end of the first piece to the back edge of the "H" flower and one end of the other piece to the edge of the "R" flower. Then sew the other end of these pieces to the back of a button bow. Sew it on by going through the button. This way the stitches won’t be visible. See photo H.
Now your felt Easter garland is complete! You can hang it from the wall using a push pin through the back of one of the loops in the bow. The garland would make a great decoration in the entry of your home to welcome your family and friends on Easter day. You could also hang this along your fireplace mantle or along your stair banister. For more Easter craft ideas please click the link below.
Return to Easter Crafts from Easter Craft Ideas: Felt Easter Garland
meena from delhi Says: Jesusfreak_04ever Says: Corine Says: Geegee Says: Bárbara Says: unknown Says: Anne Says: anushree todi Says: yvana lages Says: Lucianasatelier.blogspot.com Says: www.redroofpatterns.com Says: Anonymous Says: xana Says: Gloria Lema Says: Connie Says: Milka-Alydia Says: Dana Says: Meeru Says: florzinhasepontinhos.blogspot.com Says:
bhawna jagwani Says: Easter Craft Ideas: Felt Easter Garland |


