
Easy To Make Christmas Ornaments:
Stained Glue Snowflake
If you have been looking for ideas for easy to make Christmas ornaments, these stained glue snowflakes are classy and yet very simple to make. When you are done, you will have elegant ornaments that will really give your home a wintry feel. You can hang them on the tree where they will glow, or you could hang them in your windows where they will really catch the light. This idea would even make a great kids Christmas craft with a little help from mom or dad.
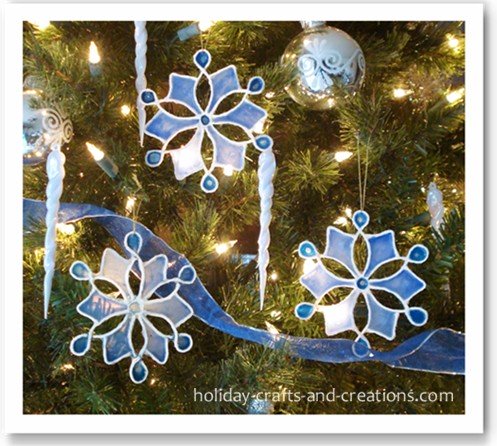
Materials For Easy To Make Christmas Ornaments:
Stained Glue Snowflake
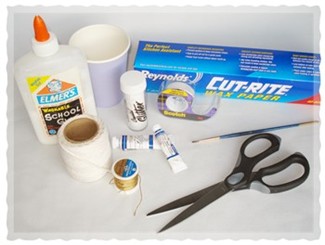
What You Will Need:
- White string
- Thread (gold)
- Wax paper
- Tape
- Elmer's glue
- Paper cup
- Watercolors (blue)
- Paintbrush
- Scissors
- Glitter (optional)
Instructions For Easy To Make Christmas Ornaments:
Stained Glue Snowflake
Step 1:
Print out the snowflake template. Tape the template to your table and then tape a piece of wax paper over the template.
Step 2:
Now measure and cut each piece of string. You will need:
1 piece – 1 1/4"
6 pieces – 1 1/2"
6 pieces – 4 1/2"
Step 3:
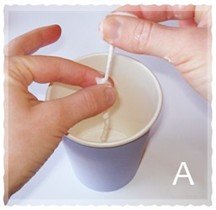
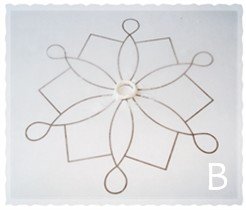
Put just enough glue in your paper cup to cover a piece of string. Saturate the one 1 1/4" piece of string in glue. As you pull the string out of the glue, use your thumb and finger to go down the string to remove the excess glue. See photo A. Lay this piece of string around the center circle of the template. Try your best to get the two ends to meet, and stay glued together. See photo B.
Step 4:
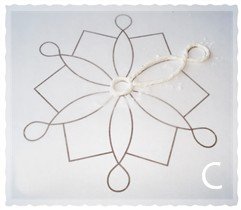
Next, get a piece of the 4 1/2" string, saturate it with glue, and squeeze out the excess. Then lay it on the template, on one of the long, "figure 8" like sections. See photo C. Make sure that the two ends meet closely to the center circle. Also it is a good idea to press the top string down tightly around the bottom string at the place where the two strings cross over each other. Repeat this step for the other five 4 1/2" pieces of string.
Step 5:
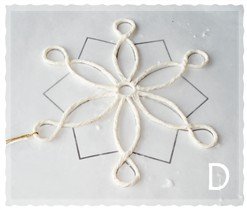
Now carefully slip a piece of thread (about 10" long) through the end loop of one of these pieces. Pull the thread snug against the edge of the string and tape it down so it stays in place while you are working. See photo D
Step 6:
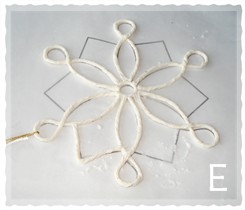
Now it is time to do the set of 1 1/2" strings. After you have saturated them in glue and squeezed them out, they are to be bent in half and placed on the remaining lines on the template. See photo E. Always try to get the ends of the strings as close as possible to its connecting string.
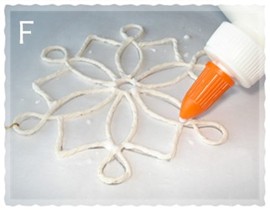
Put a dab of glue on each "joint" or connecting spot, to help reinforce them. See photo F. Let this dry for at least 12 hours.
Important Note: It is very important to let the snowflake dry completely before the next step. If it is not completely dry, the color from the blue paint will bleed out into the strings.
Step 7:
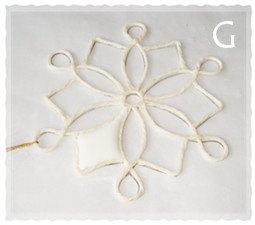
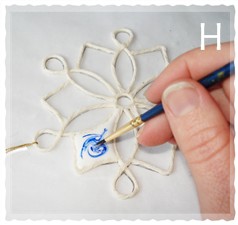
Now that the snowflake is completely dry, it is time to fill in some of the spaces with glue and color them. Fill one space at a time with enough glue so it is slightly heaping. See photo G. Before you fill the next space in, mix some watercolor paint into the glue with your paintbrush. See photo H. Keep adding paint until you are happy with the intensity. Mix the paint thoroughly. Now do each space one at a time. We filled in the diamond-like spaces, the center circle and the outer circles.
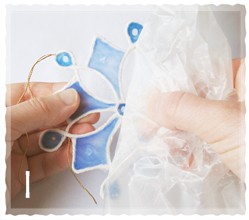
Let it dry for at least 24 hours. When it is completely dry you can remove it from the wax paper. See photo I. Make sure to peel the wax paper off slowly and carefully, while not bending the snowflake.
Tie a knot in your thread so you can hang it. Cut off any extra thread that you don’t want. There may be some extra pieces of glue around the snowflake that you will want to trim off.
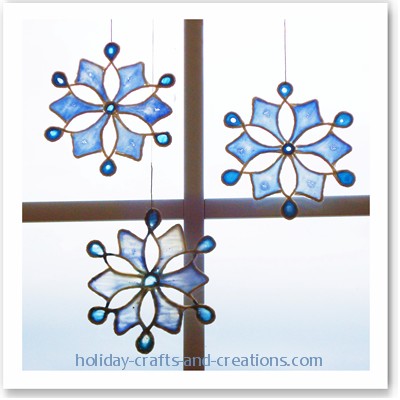
Your stained glue snowflake is now finished! Have fun with this project and maybe even create your own snowflake design! For more easy to make Christmas ornaments, click the link below.
Return to Christmas Crafts from Easy To Make Christmas Ornaments:
Stained Glue Snowflake

Darlene Says:
i like these very much! Haven't tried them yet but will this next Christmas. I m not very good at free hand so where could I get templates for different snowflakes??
Anita Argudo Says:
mefacin� su idea creo que trabajar� en el proyecto con mis estudiantes.(Your idea fascinates me, I believe I will work on this project with my students.)
Kelli from Holiday Crafts and Creations Says:
Hi Linda, you asked if these glue snowflakes hold up over the years. Well, we're not sure how many years they will last, but ours are several years old and they still look like they did when we made them. Thanks for stopping by and for your nice comment!
Linda Says:
I absolutely LOVE, LOVE this! I make them out of stained glass and this process really does a good job of mimicking that! I'm thinking I put a fishing wire with a crimp bead in for the hanger and then string a few beads to it. Do these hold up over the years?
Djzine O Says:
Glue ornaments are the best in vibrancy on a Christmas tree and stand out from the rest when light shines from behind it!
Sharon Says:
I going to try these super cute!
Maria Says:
I really love your idea, I've done your st. patty's glue craft. Also I've done others from pictures I've downloaded off the net, as long as they're not too intricate they'll work really well.
Amanda Says:
Just stopping by to let you know that I have featured your project on Fun Family Crafts! You can see it here http://funfamilycrafts.com/stained-glue-snowflake-ornaments/
dinu Says:
simply great!!!
heather Says:
ima put them all over my tree :) try wrapping paper stars there easy and pretty!!!!!!!!!!
Taylor swift fan 13 Says:
Awesome! How did u guys come up with this stuff.
handy randy Says:
This method could be used to make fairy or butterfly wings.
Michele T Says:
These are awesome - I am definitely going to make these! Thanks for the tute!
christy Says:
we,,my sweety and me,made some and they are great,,i think he had more fun than i did,,hahaa,,they are so pretty,,we used all kinds for stuff in them,,,they SHINE !!!!
Kelli at Holiday Crafts and Creations Says:
Hi Louise, yes, the glue is normal pva glue like Elmer's glue.
Louise Says:
Hi, is this glue just normal pva glue? these are gorgeous by the way!
Kelli at Holiday Crafts and Creations Says:
Hi Linda, I love your idea about making them into poinsettias, those could be really pretty! And your black string suggestion is also a great idea!! We really love hearing from our readers, thanks so much for sharing these fabulous ideas!
Linda S Says:
These are just beautiful. I can see filling in other spaces with red to make pointsettias even! And might I suggest, if you wanted more of a stained glass feel, try using black coloured string to mimic the leading. Just a thought! Great project though, and one I will have to try soon.
christy Says:
I LOVE this,,,it looks like it came from a store,,lol,, just more beautiful,,,thank you for shareing ,,i can;t wait to make a lot for christmas,,and let the grandkids help, !!!!
Kelli at Holiday Crafts and Creations Says:
Hi Alice, we never tried yarn, but I don't see why it wouldn't work. I think it would be worth a try. Just be sure to saturate it really well with glue (and then squeeze out the excess) to help cut down on the fuzziness of the yarn. About the paint, we mixed the paint into the glue really well. I hope this helps and thanks for stopping by our website!
Alice Says:
Few questions: Is it important that you use string? Would white yarn work? Also how well do you mix the paint in. Is it left kind of swirly like in the picture or do you mix it in pretty well?
Kelli at Holiday Crafts and Creations Says:
These are some interesting ideas Lissa! I especially like the idea of using tissue paper, that could turn out very pretty. If you try it out, we'd love to hear how it goes!
Lissa Dean Says:
Wonder if a person could use a little cooking spray or maybe just a drop or two of oil, spread over the work area of the wax paper to keep the dried string from sticking to the paper? I'm also wondering if one could make the snowflake outline and, once dry, use tissue paper cut-outs for color and skip the glue altogether? Would add more of a fragility factor to it, of course. Just a thought.
Emily Says:
That is absolutly B-E-A-U-tilful! There are so many wonderful words to describe its beauty:D Thank you for showing it to people... thats very kind of you!:)
Kelli at Holiday Crafts and Creations Says:
Hi Kelly! When we made these, we had a similar issue in some areas. To be honest, we're not sure why it does this, but it helps to pull it off very slowly. And the good thing is that if a little wax paper is stuck on, it's not visiable for the most part. One other suggestion, is you could try using foil instead. A friend of ours did this, and it seemed to turn out well for her. I hope this helps, and have a wonderful Holiday!!
Kelly Says:
Thank you for sharing this wonderful craft. I was just wondering, though, if it might have been something I did that made my wax paper very hard to pull off. Otherwise, absolutely brilliant, though. :)
dragana Says:
very beautiful! lovely
Elaine Miranda Says:
beautiful !
Crafty Staci Says:
These are so pretty! I'm including them in my Friday Favorites this week at craftystaci.com!
Sharon Says:
LOVE it! Cannot wait to try this! Thanks!
Shireen Says:
Absolutely awesome thank you so so much for sharing how to i love these thank you thank you
Megacrafty Says:
What a great Idea! I love snowflakes and this is something totally different- thanks for the great idea.
Melissa L Says:
It was a great craft, for me and my teenage.I have a 3yr old as well she likes to help.Oh Yeah she helped.We messed up on two before we got two good ones.I'm still keepin all of them.Be something to look back on..I have already passed this craft site to a few of my friends... Merry Christmas
